Wednesday, July 1, 2009

Fritas de Graciela


“Fritas” are usually described as Cuban hamburgers, but they are so much better! Everyone has their own recipe and our friend Millie told us that her Aunt Graciela’s fritas were fantastic and that she was willing to share it with us. YAY! Needless to say it wasn’t a hard sell - not only did we learn to make them, but we got to eat them too!

We met at Millie’s house a few days ago and got into the process of making fritas Graciela’s way. Her version is different from the traditional recipe in that she doesn’t use “pimentón” (Spanish paprika), so the flavor is less complex than what you may be used to - but when garnished with crunchy potatoes (she actually has a machine that makes the thin stringed julienne potatoes), chopped raw onion and ketchup on a potato bun - fantastic!

As usual, generations mingled as we drank wine, told stories, and most importantly laughed and had a wonderful time.

Ingredients


1 large onion
2 eggs
3 slices of white bread - torn into small pieces
1/4 cup milk
2 Tbsp ketchup
2 Tbsp Worcestershire sauce
3 tsp salt
1/2 tsp pepper
4 lbs ground sirloin
20 potato slider rolls (smaller than hamburger buns)

For Garnish
4 large potatoes - peeled, julienned and fried crisp (these can be replaced with one can of potato sticks)
1 large onion chopped
Ketchup to taste

Process

This recipe makes about 40 patties or 20 servings of two fritas per person - but most people will go for a third!
  1. Puree the onions, eggs, bread, milk, ketchup, Worcestershire sauce, salt and pepper in blender or food processor.


  2. Knead or fold the puree into the meat and let it sit for at least one hour.

  • NOTE: If making the julienne potatoes from scratch, this is the time to make them by peeling, "julienning", putting them in water for about 15 minutes, draining thoroughly and frying them until very crisp.


  1. After an hour, roll the meat mixture into 2 inch balls.

  2. Fry the meat balls until lightly brown, then flatten them and continue frying.


  3. Put the meat patty in a potato roll and garnish with the potatoes, raw onion and ketchup - and if you like, although not traditional, with mustard.

  • NOTE:They're great to make ahead of time, just freeze the meat balls in wax paper and thaw before you fry them.

We ate a lot of fritas! You'll be amazed how easy it is to eat two or three of them. They're a great summer lunch, maybe by the pool accompanied by beer, wine, soda - or my personal favorite "frita drink"...Mamey shake!

¡Buen provecho!


image source, image source

Wednesday, June 3, 2009

Rabo Encendido de Lilian (Ox-Tail)

Last week we went to our friend’s Marky’s house to learn how to make the Cuban classic – Rabo, or Ox Tail. The interesting thing is that Lilian, Marky’s mother-in-law and our teacher for the day isn’t Cuban! She was born and raised in El Salvador! While living there she never really cooked, however when she married a Cuban she learned – but she learned how to cook Cuban food.
Lucky for us because after she made it we ate it and it was delicious! While the “rabo” was cooking and later while we ate we chatted with Lilian and her husband Mario who worked in the beef business for many years and gave us all sorts of helpful “insider tips”. As always we had a wonderful meal and a wonderful time.
I want to clarify the name of the recipe. This is commonly called “Rabo Encendido” which roughly translates to “Tail on Fire”. I have always heard that it is called “Encendido” because it’s supposed to contain hot sauce. Now, traditional Cuban cooking doesn’t really use hot sauce as a staple – yes, there are exceptions, but for the most part our food is spicy from spices, but not “hot” in the Mexican sense. Therefore, this recipe does not contain hot sauce, but it can be added to taste if you like.
Ingredients
3 tbsp olive oil (enough to coat bottom of pot)
6 lbs Fresh Beef Ox Tail – cut in package
2 tbsp Badia Sazón Completa (this can be replaced by any Cuban complete seasoning)
1 large green bell pepper – diced
1 large onion – diced
4 medium garlic cloves – mashed
2½ cups Edmundo Golden Cooking Wine (this can be replaced by any dry white wine)
1½ cups of water
salt to taste (if needed)
32 oz tomato sauce
2 packs Sazón Goya with Coriander and Annatto (this can be replaced with any seasoning with coriander and annato)

Process

This recipe makes approximately 6 servings
  1. Add olive oil and meat to pot. Set on Medium heat until the meat browns.
  2. Set the temperature on High. Add complete seasoning, bell pepper and onion.
  3. Cook until onions and peppers wilt. Add garlic.
  4. Lower temperature to Medium High. Add wine and water to almost cover the meat.
  • NOTE: If more liquid is needed, add a mixture comprised of a higher wine to water ratio.
  1.  Cover until the mixture comes to a slow boil. 
  2. Stir and lower to Medium. Cover for about one hour, stirring approximately every 20 minutes until the meat can be pierced with a fork but not so tender it falls off the bone.
  3.    
  4. Once the meat can be pierced with a fork raise the temperature to Medium High, taste for salt (add to taste if needed) and cover.
  5. Begin to check the meat often, continue boiling until the meat is fork tender and the liquid has reduced to about half.
  6. Add tomato sauce and Sazón.
  7. Continue cooking on Medium for about half an hour until the liquid has thickened into sauce.


Serve with white rice.


¡Buen provecho!


image sources: ox tail, Badia Sazón Completa, Edmundo Golden Cooking Wine, Sazon Goya.


Saturday, May 2, 2009

Vaca Frita de Esther


On Sunday we set out to learn how to make “the best Vaca Frita in the world”, according to two very reliable sources – the “chef's” teen-aged grandsons. Who knows more about food than teen-aged boys? The teacher was Esther, our friend’s mother, who took over her daughter’s kitchen to teach us how to make this delicious Cuban staple.


We’re dividing the recipe into two parts – Part One is cooking the meat and Part Two is frying the meat.

Ingredients


Part One
½ head garlic – smash the cloves
3 Roma tomatoes – quartered
1 large onion – cut in large wedges
1 green bell pepper – cut in strips
1 teaspoon of Sazón or other Latin seasoning mixes
½ teaspoon salt
1½ lbs Beef Flank Steak
Water to cover the ingredients

Part 2
1 large onion – thinly sliced
3 heaping teaspoons minced garlic
Juice of 1 lime
1 tablespoon salt
Olive Oil to coat the pan

Process

This recipe makes approximately 6 servings

Part One
  1. Cut the meat vertically, with the grain, in half or thirds (depending on its width).

  1. Add the meat, vegetables and seasoning to pot.
  1. Add the water to cover the ingredients.


  1. Set pressure cooker as usual. Cook on medium for 30 minutes until the meat is fork tender.


  • NOTE: If you’re not using a pressure cooker, just follow the recipe as indicated, except let the meat and other ingredients slow boil for at least an hour until the meat is fork tender.

  • NOTE: You can also use a slow-cooker setting it on Low for about 8 hours.

  1. Turn the heat off and take pot off heat source. Let the pressure release completely.

  2. Remove meat and set aside.

  • NOTE: The broth and vegetables make a great base for soup.

Part Two
  1. Shred the meat using your hands and/or a fork.


  1. Add salt, garlic, half of the sliced onions, and the lime juice.

  2. Coat a frying pan with olive oil and add mixture to the cold pan without heating the oil.


  1. On medium heat stir the meat constantly, adding additional onions and more oil gradually as needed.


  1. Once the onions are soft and the meat cooked, raise the heat and sear the meat until it’s slightly brown and crispy.

Serve with white rice and black beans, or plantains, or all three!

As usual there was wine and great conversation, with some family gossip, memories and secrets being shared – fun! We all enjoyed a wonderful lunch of Vaca Frita and since we doubled the recipe we had enough to take some home!

¡Buen provecho!

Wednesday, February 4, 2009

Caldo Gallego de Roberto (Galician White Bean Stew)


Last Sunday we visited Grace and Roberto again - a couple of months ago we learned how to make Grace’s delicious Carne con Papas – but this time Roberto taught us how to make his famous Caldo Gallego. OH. MY. GOD! It is so good , particularly when it’s a little cold outside as it was on Super Bowl Sunday.

Here's Roberto - our teacher for the day.

Caldo Gallego is a traditional Cuban dish with origins in Galicia, Spain. It is comfort food for many because it’s so warm and hearty. You can serve Caldo Gallego in a small bowl as a soup course, but most often it is served in a big bowl as the main meal because it contain greens, beans and meat. Don’t let the amount of fat used fool you, the beans and collard greens make it a relatively healthy meal.

Since it takes a long time to make, it is best to make large quantities and freeze the remainders – it gets better with time. And again, because it takes quite a while and requires some prep work – lots of peeling and cutting – do what we did and get together with a few friends. Be sure the wine is good and plentiful and that you have some “saladitos” for sustenance during the hard work – we had ham and manchego cheese canapés along with fresh fruit.

Ingredients:


8 quarts of water
3 lbs dried Great Northern Beans
5 lbs potatoes – peeled and chunked
3 lbs turnips – peeled and chunked
4 lbs flank steak – cut into large pieces
5 lbs bone-in-ham – cut into large pieces
2 lbs bacon slices (sliced bacon slab or pancetta can also be used)
6 oz. salt pork (or pork leaf fat called “unto” in Spanish) – rinsed and cut up
10 Spanish chorizos
2 bunches of collard greens – washed well and shredded

  • NOTE: This is what the "unto" or salt pork/pork leaf fat looks like in the package.

Process

This recipe makes approximately 20 servings.
        1. Soak the beans between 6 and 8 hours.
        2. Peel and chunk potatoes and turnips.
        3. Cut the flank steak and the ham – save the ham bone.
        4. Add all the ingredients, including the ham bone – except the collard greens - to the beans and water.
        5. Bring to a boil - it doesn't look pretty, but it's OK - it'll get better.
        6. Set temperature to medium and cook until the beans are ready - approximately 90 minutes.
          • NOTE: At this point the broth will be a reddish-orange because of the chorizo. Don’t panic! It will change color once the greens are added.

        7. Wash, shred and add the collard greens.
        8. Cook for an additional 30 minutes.
        9. Remove the flank steak pieces, the ham pieces, the chorizo and the ham-bone and serve on a separate platter.

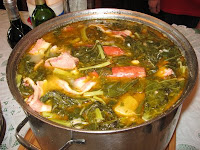
        The finished product!

        Serve with crusty bread - preferably Cuban - and a hearty Rioja wine.

        ¡Buen provecho!
         

Monday, December 1, 2008

Crème de Vié de Cris (Cuban Egg Nog - sort of)


We finally got Cris to teach us how to make her famous Crème de Vie (pronounced crehm deh vee or crehm deh vieh - it's supposed to be French!). She's been bottling this stuff and giving it as a Christmas goodie for years, and it is always very well received. Now she's decided to share the knowledge. She told us she's tried several recipes through the years and has taken elements from several until finally settling on this one.

After the lesson, we spent the afternoon enjoying pastelitos and other snacks. Cris had made a batch of Crème de Vie weeks ago so we were able to enjoy a glass or two. Everyone got a bottle of the fresh batch to take home and enjoy over the holidays.


Ingredients
2 cups sugar
1 cup water
8 egg yolks
12 oz evaporated milk
14 oz condensed milk
1 tsp vanilla extract
1 ½ cups white rum
Ground nutmeg for garnish


This recipe makes 1 quart of Crème de Vie

Process

  1. Bring sugar and water to a rolling boil until the sugar dissolves and the syrup lightly coats a spoon. Set the syrup aside to cool.

  1. Separate and lightly whisk the egg yolks.

  1. Add the evaporated and condensed milks to the yolks and whisk.

  1. Add the vanilla and rum. Mix well.

  1. Slowly add the syrup to the egg mixture after ensuring the syrup has cooled. Mix well.

  1. Strain the mixture at least twice to ensure all solid pieces of sugar or egg are removed.

  1. Pour into bottles and let them sit for about an hour. Store in the refrigerator.

  1. NOTE: Cris recommends refrigerating the crème de vie for a minimum of three weeks, the longer it's stored the smoother it gets.
  1. Serve chilled in a liqueur glass or a small glass - a little goes a long way! Garnish with nutmeg if desired.

¡Buen provecho and feliz Navidad!

Do you have any traditional Christmas recipes to share?